Create a functional account for Jira ticket system
Follow the steps below to create the functional account for Password Safe to connect to your Jira ticket system.
Some steps require slightly different actions depending on whether your Jira instance is hosted in a cloud or is local (on-premises).
- From the left sidebar in BeyondInsight, click Configuration.
The Configuration page displays. - Under Privileged Access Management, click Functional Accounts.
The Functional Accounts page displays. - Click + Create New Functional Account.
The Create New Functional Account form displays in the right panel.
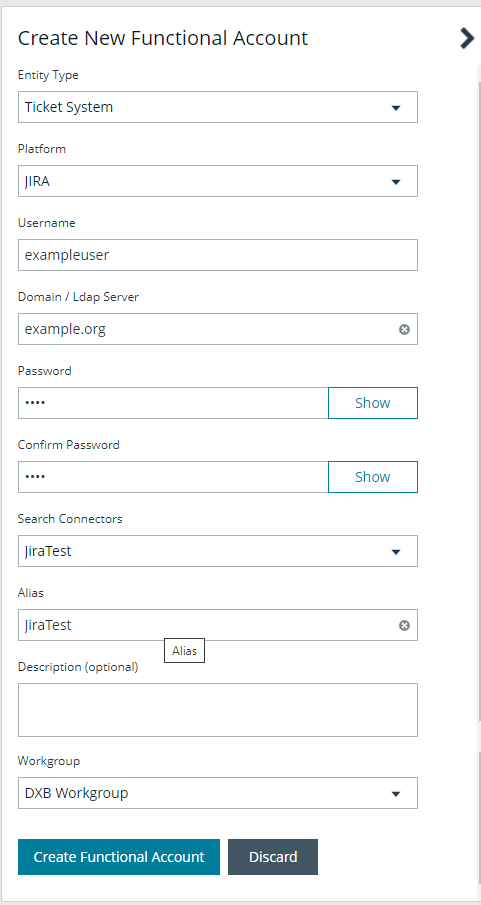
- Select Ticket System from the Entity Type dropdown.
- Select JIRA from the Platform dropdown.
- For username, enter the account to access your Jira instance.
- For a hosted Jira instance, this is an email address.
- For a local Jira instance, this is a username.
- Enter the full URL for the Jira instance in the Domain / Ldap Server field.
- For a local Jira instance, add the suffix /Jira to the domain name.
- Enter the password for your Jira account and confirm it.
- For a hosted Jira instance, you must create an API key for the password.
- Enter an Alias and a short Description, if desired.
- From the Search Connectors dropdown, select the Jira connector you created.
- Enter and Alias.
- Optionally, enter a Description.
- If applicable, select a Workgroup from the dropdown.
- Click Create Functional Account to save it.